The next menu is used to determine the method for allocating disk space.
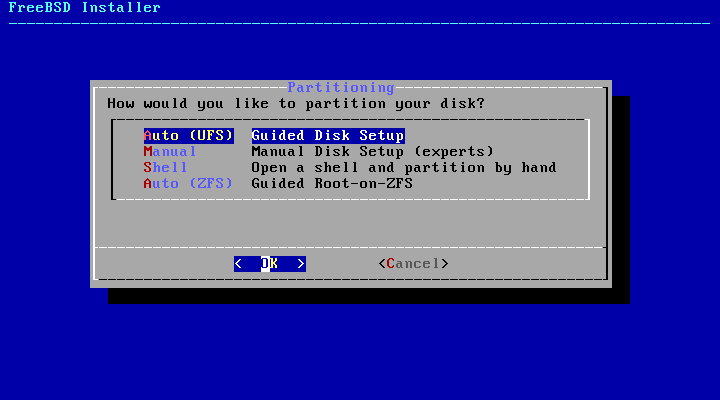
bsdinstall gives the user four methods for allocating disk space:
Auto (UFS)partitioning automatically sets up the disk partitions using theUFSfile system.Manualpartitioning allows advanced users to create customized partitions from menu options.Shellopens a shell prompt where advanced users can create customized partitions using command-line utilities like gpart(8), fdisk(8), and bsdlabel(8).Auto (ZFS)partitioning creates a root-on-ZFS system with optional GELI encryption support for boot environments.
This section describes what to consider when laying out the disk partitions. It then demonstrates how to use the different partitioning methods.
When laying out file systems, remember that hard drives
transfer data faster from the outer tracks to the inner.
Thus, smaller and heavier-accessed file systems should be
closer to the outside of the drive, while larger partitions
like /usr should be placed toward the
inner parts of the disk. It is a good idea to create
partitions in an order similar to: /,
swap, /var, and
/usr.
The size of the /var partition
reflects the intended machine's usage. This partition is
used to hold mailboxes, log files, and printer spools.
Mailboxes and log files can grow to unexpected sizes
depending on the number of users and how long log files are
kept. On average, most users rarely need more than about a
gigabyte of free disk space in
/var.
Note:
Sometimes, a lot of disk space is required in
/var/tmp. When new software is
installed, the packaging tools extract a temporary copy of
the packages under /var/tmp. Large
software packages, like Firefox
or LibreOffice may be tricky to
install if there is not enough disk space under
/var/tmp.
The /usr partition holds many of the
files which support the system, including the FreeBSD Ports
Collection and system source code. At least 2 gigabytes of
space is recommended for this partition.
When selecting partition sizes, keep the space requirements in mind. Running out of space in one partition while barely using another can be a hassle.
As a rule of thumb, the swap partition should be about double the size of physical memory (RAM). Systems with minimal RAM may perform better with more swap. Configuring too little swap can lead to inefficiencies in the VM page scanning code and might create issues later if more memory is added.
On larger systems with multiple SCSI disks or multiple IDE disks operating on different controllers, it is recommended that swap be configured on each drive, up to four drives. The swap partitions should be approximately the same size. The kernel can handle arbitrary sizes but internal data structures scale to 4 times the largest swap partition. Keeping the swap partitions near the same size will allow the kernel to optimally stripe swap space across disks. Large swap sizes are fine, even if swap is not used much. It might be easier to recover from a runaway program before being forced to reboot.
By properly partitioning a system, fragmentation
introduced in the smaller write heavy partitions will not
bleed over into the mostly read partitions. Keeping the
write loaded partitions closer to the disk's edge will
increase I/O performance in the
partitions where it occurs the most. While
I/O performance in the larger partitions
may be needed, shifting them more toward the edge of the disk
will not lead to a significant performance improvement over
moving /var to the edge.
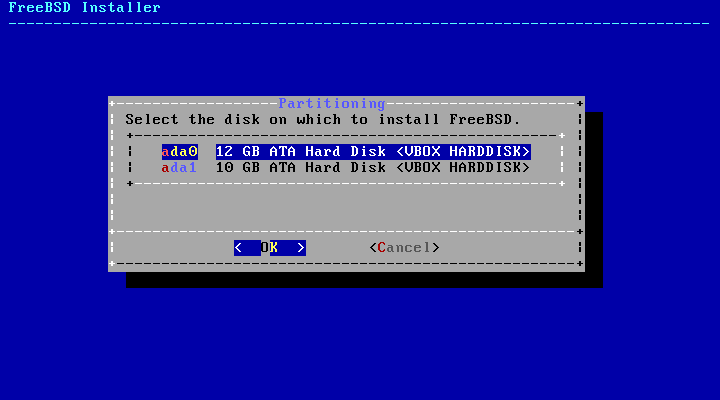
When this method is selected, a menu will display the available disk(s). If multiple disks are connected, choose the one where FreeBSD is to be installed.
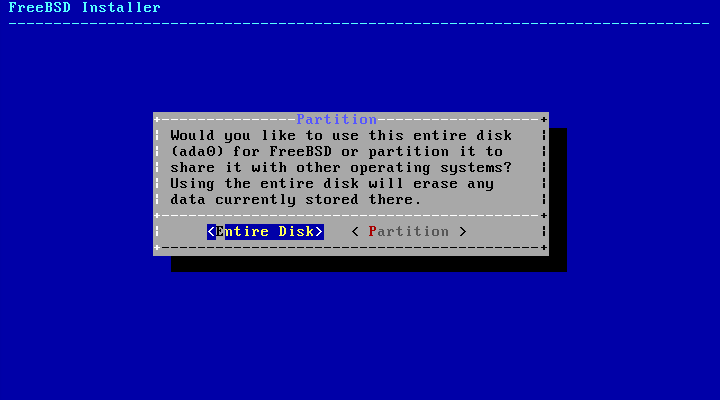
Once the disk is selected, the next menu prompts to install to either the entire disk or to create a partition using free space. If is chosen, a general partition layout filling the whole disk is automatically created. Selecting creates a partition layout from the unused space on the disk.
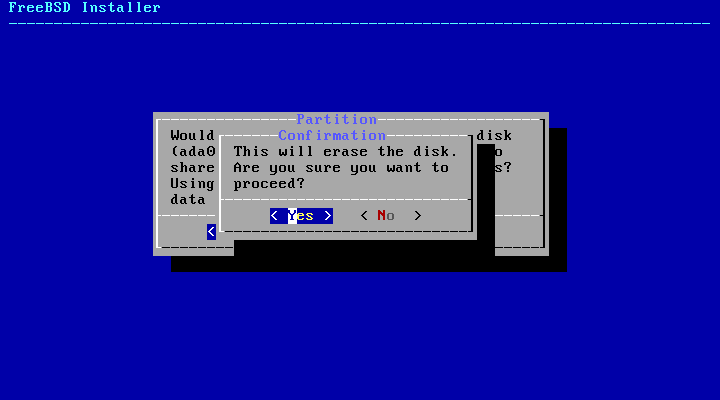
After is chosen bsdinstall displays a dialog indicating that the disk will be erased.
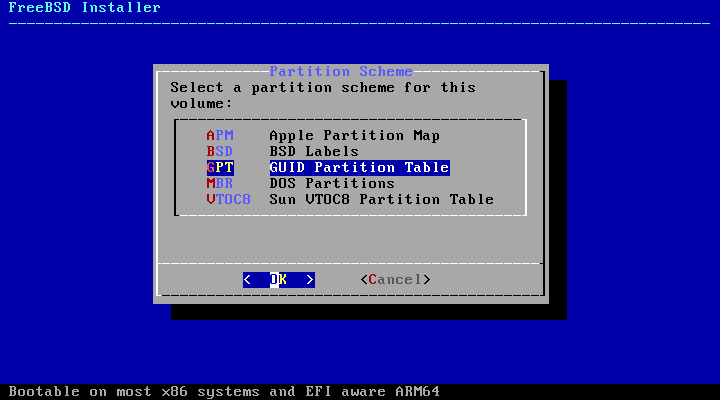
The next menu shows a list with the partition schemes types. GPT is usually the most appropriate choice for amd64 computers. Older computers that are not compatible with GPT should use MBR. The other partition schemes are generally used for uncommon or older computers. More information is available in Table 2.1, “Partitioning Schemes”.
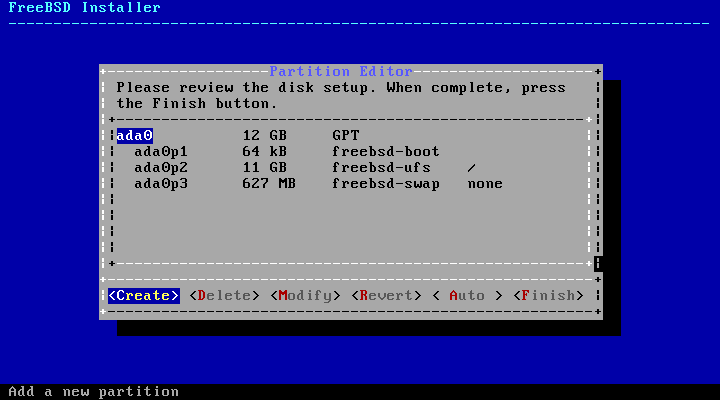
After the partition layout has been created, review it to ensure it meets the needs of the installation. Selecting will reset the partitions to their original values and pressing will recreate the automatic FreeBSD partitions. Partitions can also be manually created, modified, or deleted. When the partitioning is correct, select to continue with the installation.
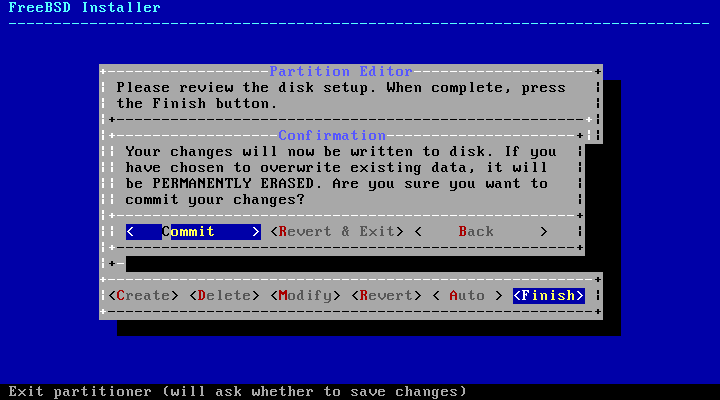
Once the disks are configured, the next menu provides the last chance to make changes before the selected drives are formatted. If changes need to be made, select to return to the main partitioning menu. exits the installer without making any changes to the drive. Select to start the installation process.
To continue with the installation process go to Section 2.7, “Fetching Distribution Files”.
Selecting this method opens the partition editor:
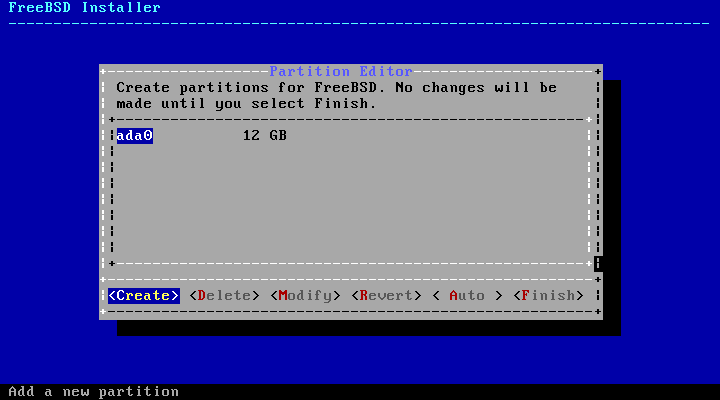
Highlight the installation drive
(ada0 in this example) and select
to display a menu
of available partition schemes:
GPT is usually the most appropriate choice for amd64 computers. Older computers that are not compatible with GPT should use MBR. The other partition schemes are generally used for uncommon or older computers.
| Abbreviation | Description |
|---|---|
| APM | Apple Partition Map, used by PowerPC®. |
| BSD | BSD label without an MBR, sometimes called dangerously dedicated mode as non-BSD disk utilities may not recognize it. |
| GPT | GUID Partition Table (http://en.wikipedia.org/wiki/GUID_Partition_Table). |
| MBR | Master Boot Record (http://en.wikipedia.org/wiki/Master_boot_record). |
| VTOC8 | Volume Table Of Contents used by Sun SPARC64 and UltraSPARC computers. |
After the partitioning scheme has been selected and created, select again to create the partitions. The Tab key is used to move the cursor between fields.
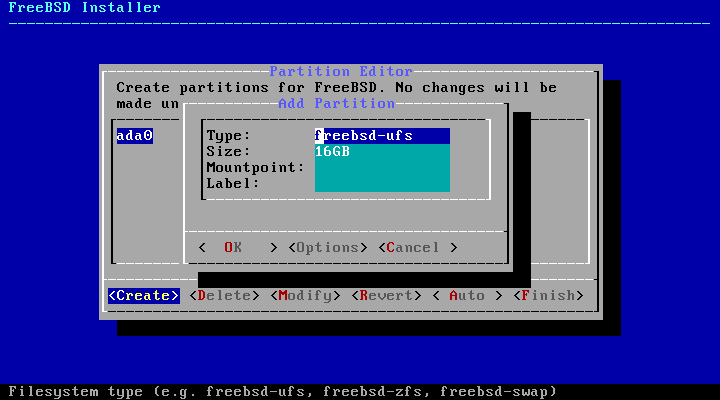
A standard FreeBSD GPT installation uses at least three partitions:
freebsd-boot- Holds the FreeBSD boot code.freebsd-ufs- A FreeBSD UFS file system.freebsd-zfs- A FreeBSD ZFS file system. More information about ZFS is available in Chapter 20, The Z File System (ZFS).freebsd-swap- FreeBSD swap space.
Refer to gpart(8) for descriptions of the available GPT partition types.
Multiple file system partitions can be created and some
people prefer a traditional layout with separate partitions
for /, /var,
/tmp, and /usr. See
Example 2.1, “Creating Traditional Split File System
Partitions” for an
example.
The Size may be entered with common
abbreviations: K for kilobytes,
M for megabytes, or
G for gigabytes.
Tip:
Proper sector alignment provides the best performance, and making partition sizes even multiples of 4K bytes helps to ensure alignment on drives with either 512-byte or 4K-byte sectors. Generally, using partition sizes that are even multiples of 1M or 1G is the easiest way to make sure every partition starts at an even multiple of 4K. There is one exception: the freebsd-boot partition should be no larger than 512K due to current boot code limitations.
A Mountpoint is needed if the partition
will contain a file system. If only a single
UFS partition will be created, the
mountpoint should be /.
The Label is a name by which the
partition will be known. Drive names or numbers can change if
the drive is connected to a different controller or port, but
the partition label does not change. Referring to labels
instead of drive names and partition numbers in files like
/etc/fstab makes the system more tolerant
to hardware changes. GPT labels appear in
/dev/gpt/ when a disk is attached. Other
partitioning schemes have different label capabilities and
their labels appear in different directories in
/dev/.
Tip:
Use a unique label on every partition to avoid
conflicts from identical labels. A few letters from the
computer's name, use, or location can be added to the label.
For instance, use labroot or
rootfslab for the UFS
root partition on the computer named
lab.
For a traditional partition layout where the
/, /var,
/tmp, and /usr
directories are separate file systems on their own
partitions, create a GPT partitioning
scheme, then create the partitions as shown. Partition
sizes shown are typical for a 20G target disk. If more
space is available on the target disk, larger swap or
/var partitions may be useful. Labels
shown here are prefixed with ex for
“example”, but readers should use other unique
label values as described above.
By default, FreeBSD's gptboot expects
the first UFS partition to be the
/ partition.
| Partition Type | Size | Mountpoint | Label |
|---|---|---|---|
freebsd-boot | 512K | ||
freebsd-ufs | 2G | / | exrootfs |
freebsd-swap | 4G | exswap | |
freebsd-ufs | 2G | /var | exvarfs |
freebsd-ufs | 1G | /tmp | extmpfs |
freebsd-ufs | accept the default (remainder of the disk) | /usr | exusrfs |
After the custom partitions have been created, select to continue with the installation and go to Section 2.7, “Fetching Distribution Files”.
This partitioning mode only works with whole disks and will erase the contents of the entire disk. The main ZFS configuration menu offers a number of options to control the creation of the pool.
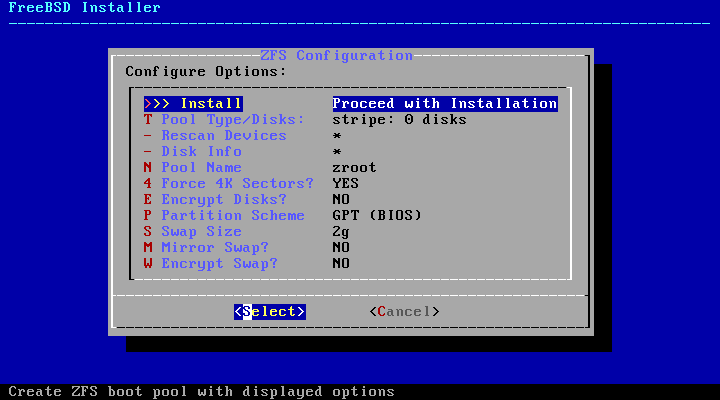
Here is a summary of the options which can be used in this menu:
Install- Proceed with the installation with the selected options.Pool Type/Disks- Allow to configure thePool Typeand the disk(s) that will constitute the pool. The automatic ZFS installer currently only supports the creation of a single top level vdev, except in stripe mode. To create more complex pools, use the instructions in Section 2.6.5, “Shell Mode Partitioning” to create the pool.Rescan Devices- Repopulate the list of available disks.Disk Info- Disk Info menu can be used to inspect each disk, including its partition table and various other information such as the device model number and serial number, if available.Pool Name- Establish the name of the pool. The default name is zroot.Force 4K Sectors?- Force the use of 4K sectors. By default, the installer will automatically create partitions aligned to 4K boundaries and force ZFS to use 4K sectors. This is safe even with 512 byte sector disks, and has the added benefit of ensuring that pools created on 512 byte disks will be able to have 4K sector disks added in the future, either as additional storage space or as replacements for failed disks. Press the Enter key to chose to activate it or not.Encrypt Disks?- Encrypting the disks allows the user to encrypt the disks using GELI. More information about disk encryption is available in Section 18.12.2, “Disk Encryption withgeli”. Press the Enter key to chose activate it or not.Partition Scheme- Allow to choose the partition scheme. GPT is the recommended option in most cases. Press the Enter key to chose between the different options.Swap Size- Establish the amount of swap space.Mirror Swap?- Allows the user to mirror the swap between the disks. Be aware, enabling mirror swap will break crash dumps. Press the Enter key to activate it or not.Encrypt Swap?- Allow the user the possibility to encrypt the swap. Encrypts the swap with a temporary key each time that the system boots and discards it on reboot. Press the Enter key to chose activate it or not. More information about swap encryption in Section 18.13, “Encrypting Swap”.
Select T to configure the Pool
Type and the disk(s) that will constitute the
pool.
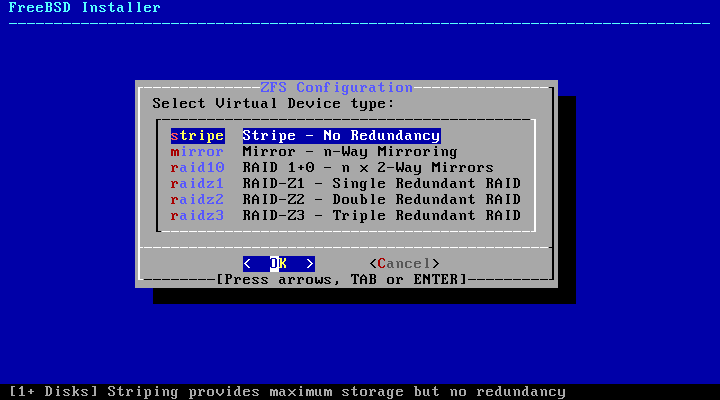
Here is a summary of the Pool Type
which can be selected in this menu:
stripe- Striping provides maximum storage of all connected devices, but no redundancy. If just one disk fails the data on the pool is lost irrevocably.mirror- Mirroring stores a complete copy of all data on every disk. Mirroring provides a good read performance because data is read from all disks in parallel. Write performance is slower as the data must be written to all disks in the pool. Allows all but one disk to fail. This option requires at least two disks.raid10- Striped mirrors. Provides the best performance, but the least storage. This option needs at least an even number of disks and a minimum of four disks.raidz1- Single Redundant RAID. Allow one disk to fail concurrently. This option needs at least three disks.raidz2- Double Redundant RAID. Allows two disks to fail concurrently. This option needs at least four disks.raidz3- Triple Redundant RAID. Allows three disks to fail concurrently. This option needs at least five disks.
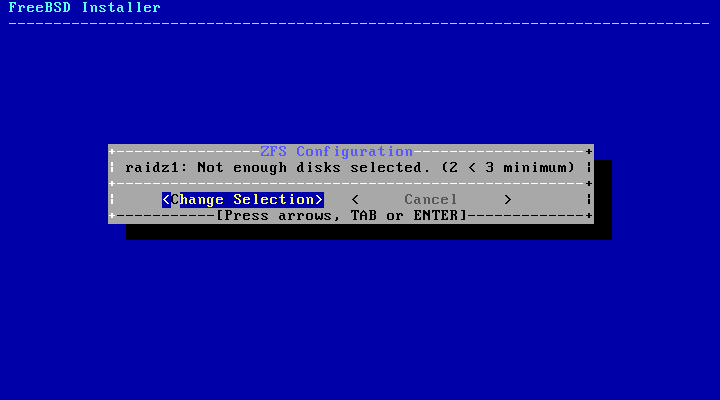
Once a Pool Type has been selected, a
list of available disks is displayed, and the user is prompted
to select one or more disks to make up the pool. The
configuration is then validated, to ensure enough disks are
selected. If not, select to return to the list of disks, or
to change the
Pool Type.
If one or more disks are missing from the list, or if disks were attached after the installer was started, select to repopulate the list of available disks.
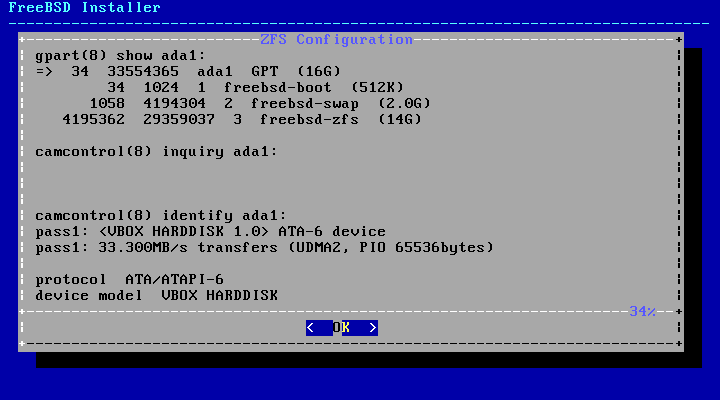
To avoid accidentally erasing the wrong disk, the menu can be used to inspect each disk, including its partition table and various other information such as the device model number and serial number, if available.
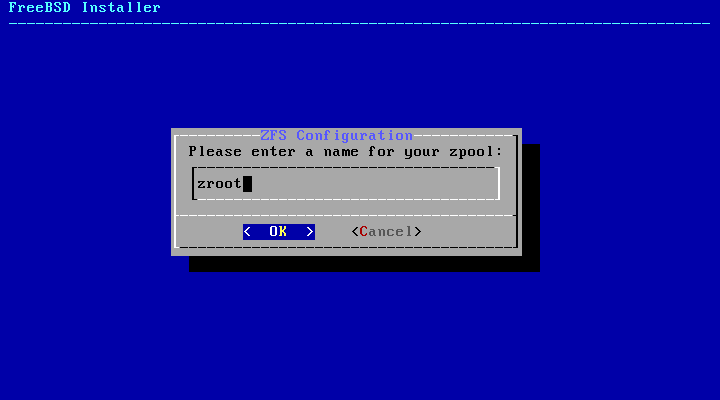
Select N to configure the
Pool Name. Enter the desired name then
select to establish it or
to return to the
main menu and leave the default name.
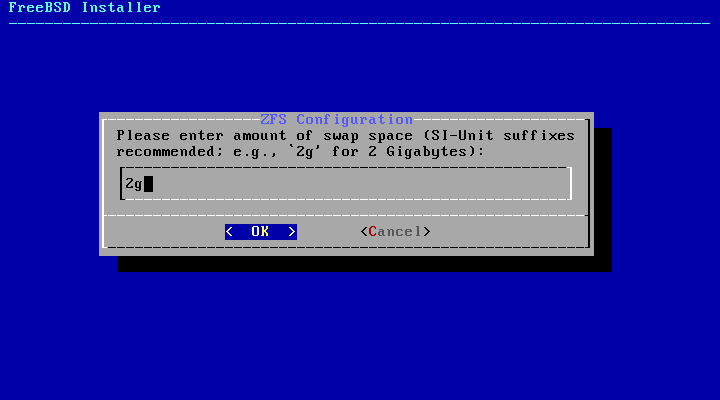
Select S to set the amount of swap. Enter the desired amount of swap and then select to establish it or to return to the main menu and let the default amount.
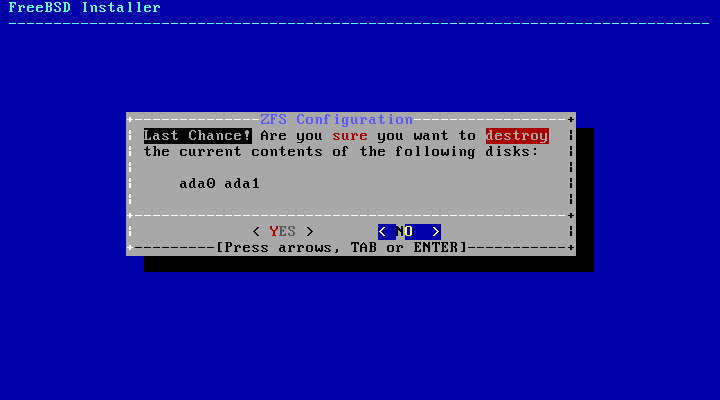
Once all options have been set to the desired values, select the option at the top of the menu. The installer then offers a last chance to cancel before the contents of the selected drives are destroyed to create the ZFS pool.
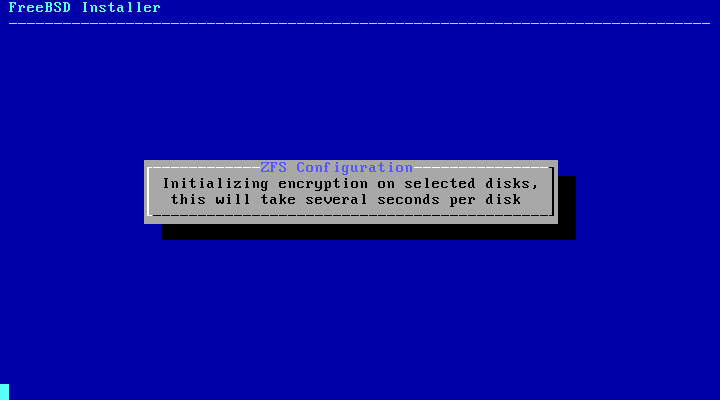
If GELI disk encryption was enabled, the installer will prompt twice for the passphrase to be used to encrypt the disks. And after that the initializing of the encryption begins.
The installation then proceeds normally. To continue with the installation go to Section 2.7, “Fetching Distribution Files”.
When creating advanced installations, the
bsdinstall partitioning menus may
not provide the level of flexibility required. Advanced users
can select the option from the
partitioning menu in order to manually partition the drives,
create the file system(s), populate
/tmp/bsdinstall_etc/fstab, and mount the
file systems under /mnt. Once this is
done, type exit to return to
bsdinstall and continue the
installation.